Enhanced Headings in Canvas
Canvas offers flexibility in creating digital content with the Rich Content Editor (RCE). You're probably familiar with typing words, adding images, and inserting links right into the what-you-see-is-what-you-get (WYSIWYG) view. This guide walks you through switching to HTML view to enhance the appearance of text headings:
- Open the RCE anywhere in Canvas.
- Toggle to the HTML view.
- Paste the heading code: <div style="background-color: #000000; padding: 5px;"> <h2 style="text-align: left;"><strong><span style="color: #ffffff; font-size: 24pt;">YOUR H2 HEADING TEXT GOES HERE</span></strong></h2> </div>
- Change the background, font color, and text in the copied code.
- Save your changes.
HTML code must be exact to work correctly. Ensure you:
- Enter your replacements exactly where placeholders are located in copied code.
- Do not accidentally replace any of the other characters when inputting your new values.
- Avoid extra spacing or duplicating punctuation that is not represented in the code provided.
Need more detail?
Delve into the in-depth walkthrough below, complete with images and various notes for every step.
Step 1: Open the RCE
Head to any area within Canvas you want to place a heading with the RCE. This is the space you edit content in Pages, Announcements, and more.

Step 2: Switch to HTML View
Click on the HTML toggle button to switch from the what-you-see-is-what-you-get (WYSIWYG) view. Note, the HTML editor can be utilized to customize your course, but not all code is accepted by Canvas. Canvas Help agents do not provide support for these types of custom solutions.

Step 3: Paste the Code
Copy the line of code for the heading level you need and paste it where you'd like to insert your enhanced heading:
-
Heading: <div style="background-color: #000000; padding: 5px;"> <h2 style="text-align: left;"><strong><span style="color: #ffffff; font-size: 24pt;">YOUR H2 HEADING TEXT GOES HERE</span></strong></h2> </div>
-
Subheading: <div style="background-color: #000000; padding: 5px;"> <h3 style="text-align: left;"><strong><span style="color: #ffffff; font-size: 18pt;">YOUR H3 SUBHEADING TEXT GOES HERE</span></strong></h3> </div>
-
Sub-Subheading: <div style="background-color: #000000; padding: 5px;"> <h4 style="text-align: left;"><strong><span style="color: #ffffff; font-size: 16pt;">YOUR H4 SUBHEADING TEXT GOES HERE</span></strong></h4> </div>

To customize the look, you'll replace three areas in the pasted code with information relevant to your heading. Steps 4, 5, and 6 walk through that process.

Step 4: Customize the Background Color
HTML code uses hex values for colors. If you need some help with colors, learn more about accessible color palettes before you choose and use a palette generator. For the code provided, the background color is black and the font is white. Black and white are a classic choice for the highest contrast and best visibility.
If you do not want black, replace #000000 with the hex code of your preferred background color:
<div style="background-color: #000000; padding: 5px;"> <h2 style="text-align: left;"><strong><span style="color: #ffffff; font-size: 24pt;">YOUR H2 HEADING TEXT GOES HERE</span></strong></h2> </div>

Step 5: Customize the Font Color
Font color also relies on hex code and choosing good contrast. Light background color works best with black font and dark background color works best with white font.
If you do not want white, replace #ffffff with the hex code of your preferred font color:
<div style="background-color: #000000; padding: 5px;"> <h2 style="text-align: left;"><strong><span style="color: #ffffff; font-size: 24pt;">YOUR H2 HEADING TEXT GOES HERE</span></strong></h2> </div>

Step 6: Customize the Text Placeholder
Replace the YOUR...TEXT GOES HERE placeholder with a heading for your content. Remember, headings break up your page of information into easier to comprehend chunks and give hierarchy order.
<div style="background-color: #000000; padding: 5px;"> <h2 style="text-align: left;"><strong><span style="color: #ffffff; font-size: 24pt;">YOUR H2 HEADING TEXT GOES HERE</span></strong></h2> </div>

Step 7: Leave HTML View
When you click the HTML toggle button, Canvas will switch back to the what-you-see-is-what-you-get (WYSIWYG) view. Even though this step is optional, it is how you can ensure your heading is located in the place you want within your other content and looks the way you want it to.

Step 8: Save Your Work
Click Save to apply your changes and see the final results.


Enhanced Headings in Canvas FAQ
Can I use any colors I like?
No. You must use color combinations that pass contrast requirements. Too light of font on the background is impossible for many people to see clearly. Color blindness is a common challenge that makes red, green, and other colors appear grey. We recommend learning about accessible color palettes and using the WebAIM color contrast checker to ensure your content works for all learners.
What color combinations are best to avoid?
Yellow and white, red and green, green and brown, green and blue, blue and gray, blue and purple, green and gray, green and black, red and pink, and any variation of monochromatic color schemes can be difficult to see clearly. When in doubt, use a contrast checker and ask for feedback from a peer.
Why do I have an accessibility error?

Canvas requires the first heading to be H2 level. Changing the code to H1 results in an accessibility error when you leave HTML view. The accessibility checker feature gives you a warning notification and, if you click to open the details, provides a short explanation. Always follow a clear hierarchy in your content, starting with H2 for the heading, then H3 for subheadings related to the H2 heading, and then H4 for sub-subheadings related to the H3 subheading. Following a clear hierarchy ensures students using assistive technology can consume your content without confusion.

Can I copy my headings?
Yes. Once you are happy with the appearance in one area, copying the headings is an easy way to ensure your course looks consistent.
How do I update the text?
The text in any heading can be edited directly in the RCE, without having to go into the HTML view. However, backspace and delete can mess up your HTML code and you'll have to fix any issues with that in the HTML view.

Visual Guide
Written Guide
Step 1
Head to any area within Canvas that has the Rich Content Editor (RCE). This is the space where you'll edit content that goes on a page, at the start of an assignment, or even when defining a Canvas discussion board.
It looks like the area pictured [left] but can also be identified with menu options such as 'Edit', 'View', 'Insert', 'Format', 'Tools', 'Table' or tools like 'Insert Link', 'Insert Media', and many other word processor options like Bold, Italicized, and underline options.
Step 2
Click on the < / > button in the bottom right of the RCE space, next to the total word count.
This is the HTML editor and can be utilized to customize the Canvas experience through more granular efforts, not unlike this guide.
Step 3
Find the space/line where you'd like to insert your headers.
Copy/paste this line of code:
<table style="width: width-percentage-value%; border-collapse: collapse; background-color: #aa1010; float: left;" border="3px" cellpadding="6px">
<tbody>
<tr>
<td style="width: 100%;"><span style="font-size: 14pt; color: #ffffff;"><strong>YOUR HEADER / TITLE TEXT GOES HERE</strong></span></td>
</tr>
</tbody>
</table>
If will look like this in the editor...

Step 4
Now that the code is in the editor, you'll need to replace only two parts of the copy/pasted code with information relevant to what you want that header to be. The parts of the code are in red, but can be identified as:
width-percentage-value - Replace this value with a number between 1-100 for the preferred width percentage of the dividing line. This is how much of the page, from left to right, it will take up.
YOUR HEADER/TITLE TEXT GOES HERE - Replace this text with whatever you want your header title to be.
Make sure to enter your replacements exactly where these three values are and do not leave any part of the old values and adversely, do not replace any of the other characters when inputting your new values.
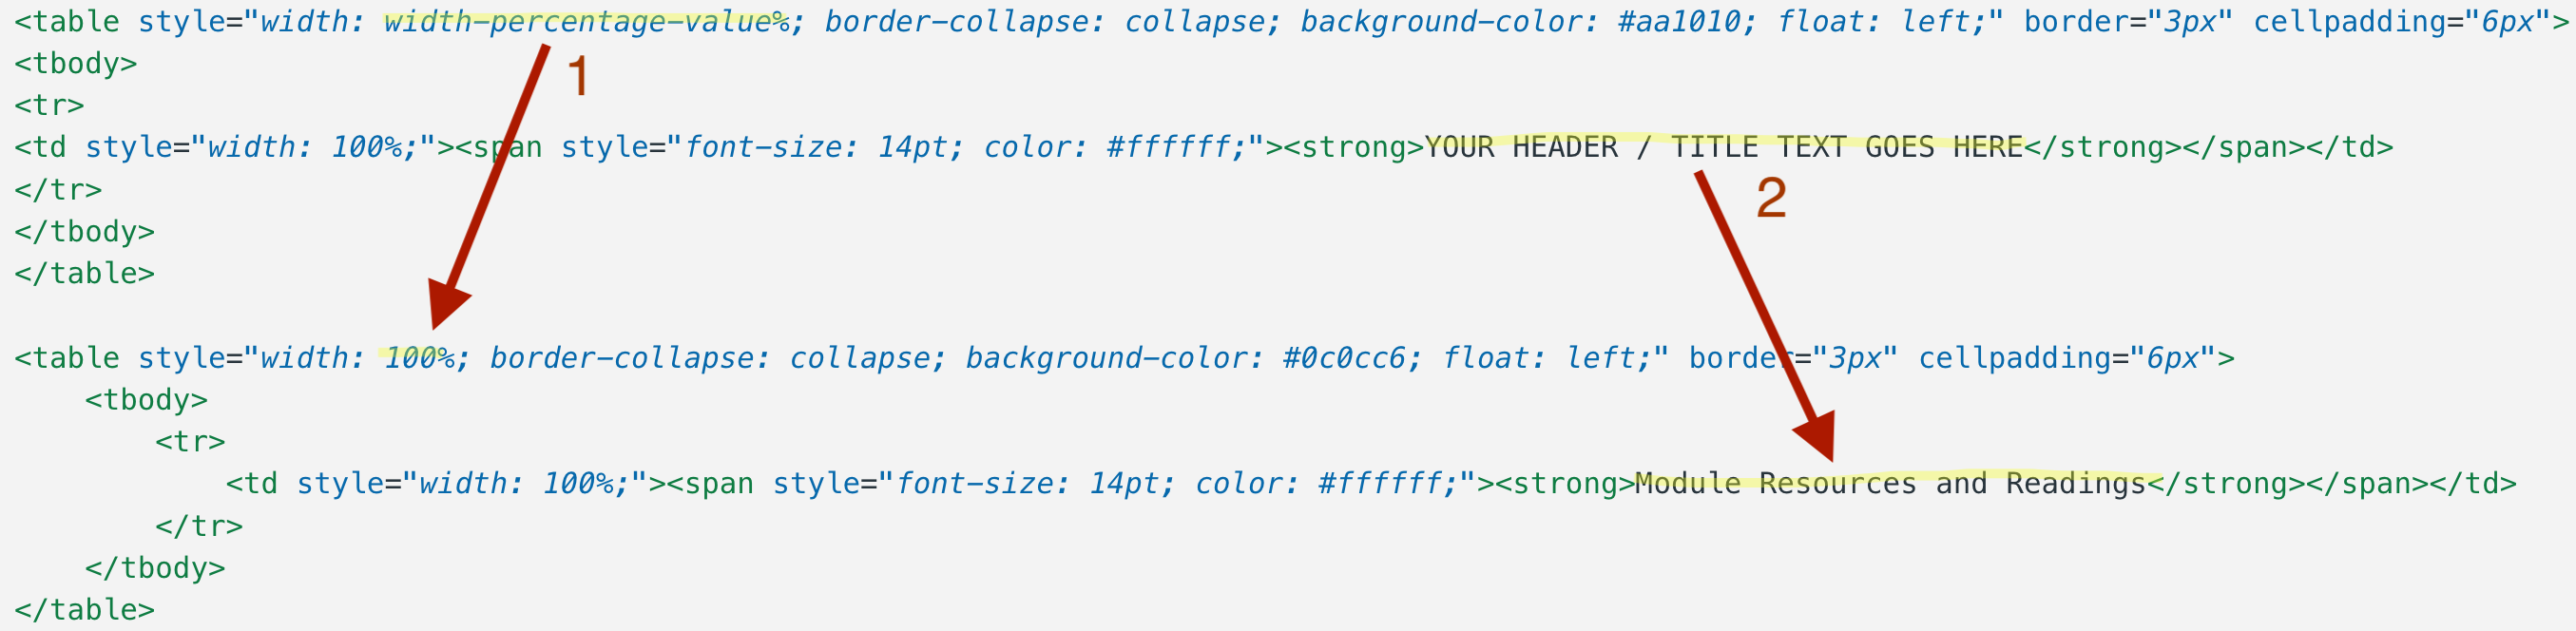
Example: Notice how In line 1, I changed the width-percentage-value to be 100 while leaving the % sign. Also, in line 2, I changed the header of the divider.
Output:
Step 5
Don't forget to hit the 'Save' button once you've replaced the values to your button in step 4!
Alternatively, you can click on the button in the bottom right to go back to the RCE and edit other elements of your page and verify the page divider is what you want.
Finished! Your page header table will appear on your Canvas page.
Customize your Header/Divider
Instructions
Copy/paste this code:
<table style="width: width-percentage-value%; border-collapse: collapse; background-color: #aa1010; float: left;" border="3px" cellpadding="6px">
<tbody>
<tr>
<td style="width: 100%;"><span style="font-size: 14pt; color: #ffffff;"><strong>YOUR HEADER / TITLE TEXT GOES HERE</strong></span></td>
</tr>
</tbody>
</table>
Make sure to enter your replacements exactly where these three values are and do not leave any part of the old values and adversely, do not replace any of the other characters when inputting your new values.
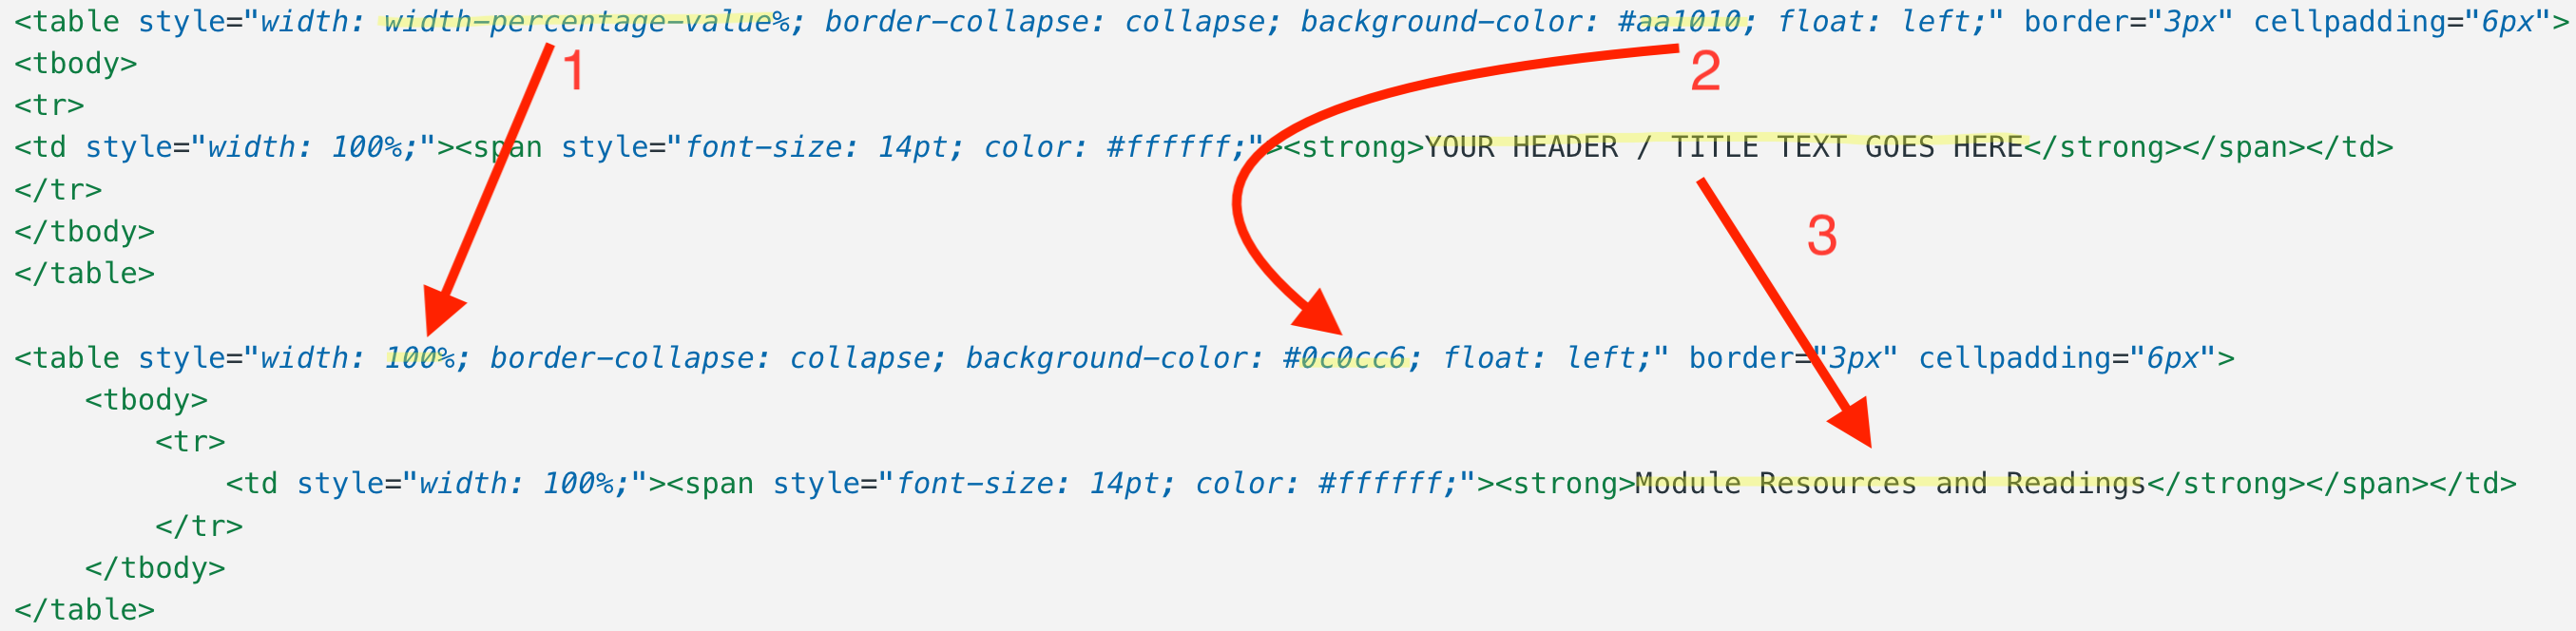
Example: Notice how In line 1, I changed the width-percentage-value to be 100 while leaving the % sign. Also, in line 2, I didn't want the default Cardinal red so I changed the value to be a Royal Blue with the 0c0cc6 value. In line 2, I changed the title of the header to 'Module Resources and Readings'
Output

